Creating a GitHub action that runs your Rust application
How to automatically generate a GitHub action that executes your Rust application, with Docker.
Among all the benefits you have by hosting open source code on GitHub, running GitHub actions for free is my favorite feature! Today, I’d like to show how you can turn any Rust application into a GitHub action, that people will be able to use within their own workflow.
If you are curious, I created a faster1 version of find, FilesFinder, that can be a companion to this blog post.
About GitHub actions
If you know nothing about GitHub actions, and you are a developer on hosting its code on GitHub, then this section is for you! Otherwise, you can skip to the next sections.
Put simply, GitHub workflows are a series of actions that are run when triggered by some pre-defined conditions. For example, everytime you push in a pull request, you want to check that your application can build. This is pretty useful to avoid merging erroneous code to the main branch.
Workflows are defined using YAML files, that must be put in the .github/workflows directory of your repository.
1
2
3
4
5
6
7
8
9
10
11
12
13
14
15
16
17
18

name: Check compilation

on:
  # Run on any PR
  pull_request:

jobs:
  check:  # Any action can contain multiple jobs
    runs-on: ubuntu-latest  # OS on which the job runs
    steps:  # Each job consists in a series of steps
    - name: Checkout  # Clone git repository
      uses: actions/checkout@v3

    - name: Install stable toolchain
      uses: dtolnay/rust-toolchain@stable

    - name: Check that code can compile
      run: cargo check  # Run the `cargo check` command
Each step with a uses: attribute indicates usage of some GitHub action, created by some other user on GitHub and made publicly available on the GitHub Marketplace.
For more details, read the GitHub actions quickstart.
Motivation
One may ask a very fair question: “why bothering creating a GitHub action, when you can already run arbitrary code inside a workflow?”.
In my opinion, there are two main benefits of creating your own GitHub action:
-
shareability, because anyone can reuse your action, even you, via a simple
uses: myusername/myrepo@some-tagone-liner; - and execution speed, as building a Rust application can take quite some time, and rebuilding the same code again and again might not be very interesting.
Note that the second statement is only true if your action is built from a Dockerfile, not a Javascript or a composite action.
Project setup
Before starting, I’ll assume you have the following project structure:
1
2
3
4
5

.
├── Cargo.lock (optional)
├── Cargo.toml
└── src (content may vary)
    └── bin.rs
where the binaries can be installed with cargo install --path ., and the executable name will be myapp.
1
2
3

[[bin]]
name = "myapp"
path = "src/bin.rs"
Such that you can call your application with something like this:
1

myapp --option1 'value1'
As everything will run on GitHub’s servers, you don’t actually need anything specific to be installed (no Cargo, no Docker). However, having those tools installed locally is always a good idea for testing purposes.
Creation an action
As mentioned above, there exists three ways for creating a GitHub action:
- using Javascript code;
- composing multiple actions, this is useful if you can express your action as combination of other actions;
- or using a Docker image, if you want to run arbitrary complex code, and need something else than just pure Javascript.
For Rust code, that we don’t want to spend time recompiling on every workflow run, the Docker way is our on solution2.
Docker action
As documented by GitHub, creating a Docker action requires three files:
- an
action.yml, that defines the inputs and outputs of our action; - a
Dockerfile, that will be used to build the image to run our application; - an
entrypoint.sh, for actually executing code;
and you would obtain the following structure:
1
2
3
4
5
6
7
8

  .
+ ├── action.yml
  ├── Cargo.lock (optional)
  ├── Cargo.toml
+ ├── Dockerfile
+ ├── entrypoint.sh
  └── src (content may vary)
      └── bin.rs
The action.yml file contains important information for users, namely the inputs and outputs, as well more fancy (but required) fields such as the branding. This, and the README.md, will be displayed on the Marketplace.
1
2
3
4
5
6
7
8
9
10
11
12
13
14
15
16
17
18
19

name: MyApp
author: Jérome Eertmans
description: My super Rust application
branding:  # You can change this
  icon: align-left
  color: blue
inputs:
  args:
    description: Arguments passed to `myapp`
    required: true
    default: ''
outputs:
  results:
    description: The results from calling `myapp`
runs:
  using: docker
  image: Dockerfile
  args:
  - ${{ inputs.args }}
Then, we need to create a Dockerfile that will contain our application.
I won’t go into details about how it works, but you can create a lightweight Docker image with the following few lines:
1
2
3
4
5
6
7
8
9
10
11
12

FROM rust:1.67 AS build
COPY . .
RUN rustup target add x86_64-unknown-linux-musl
RUN cargo install --path . --target x86_64-unknown-linux-musl

FROM alpine:3.16.0 AS runtime
COPY --from=build /usr/local/cargo/bin/myapp /usr/local/bin/myapp

FROM runtime as action
COPY entrypoint.sh /entrypoint.sh

ENTRYPOINT [ /entrypoint.sh ]
Basically, you build your Rust application using a Rust image that contains the Rust toolchain, and you then copy it to a lightweight Linux image.
If needed, you may want to update the Rust and Alpine versions.
The code was largely inspired from the Rust Docker hub page.
Building this image can be performed with the following command:
1

docker build --target runtime -t container .
The
--target runtimetells Docker to stop at theruntimestage. I.e., it will not run theactionpart. This is because I don’t want to docker image to executeentrypoint.sh.
In the Publishing section, I will show you how you can publish your image to some container registry, to make it available online.
Finally, the entrypoint.sh file will basically call myapp, and echo the results to store them appropriately.
1
2
3
4

#!/bin/sh -l

results=$(echo "$@" | xargs myapp)
echo "results=$results" >> $GITHUB_OUTPUT
Make sure that
entrypoint.shis executable. On Linux, you can do so withchmod +x entrypoint.sh.
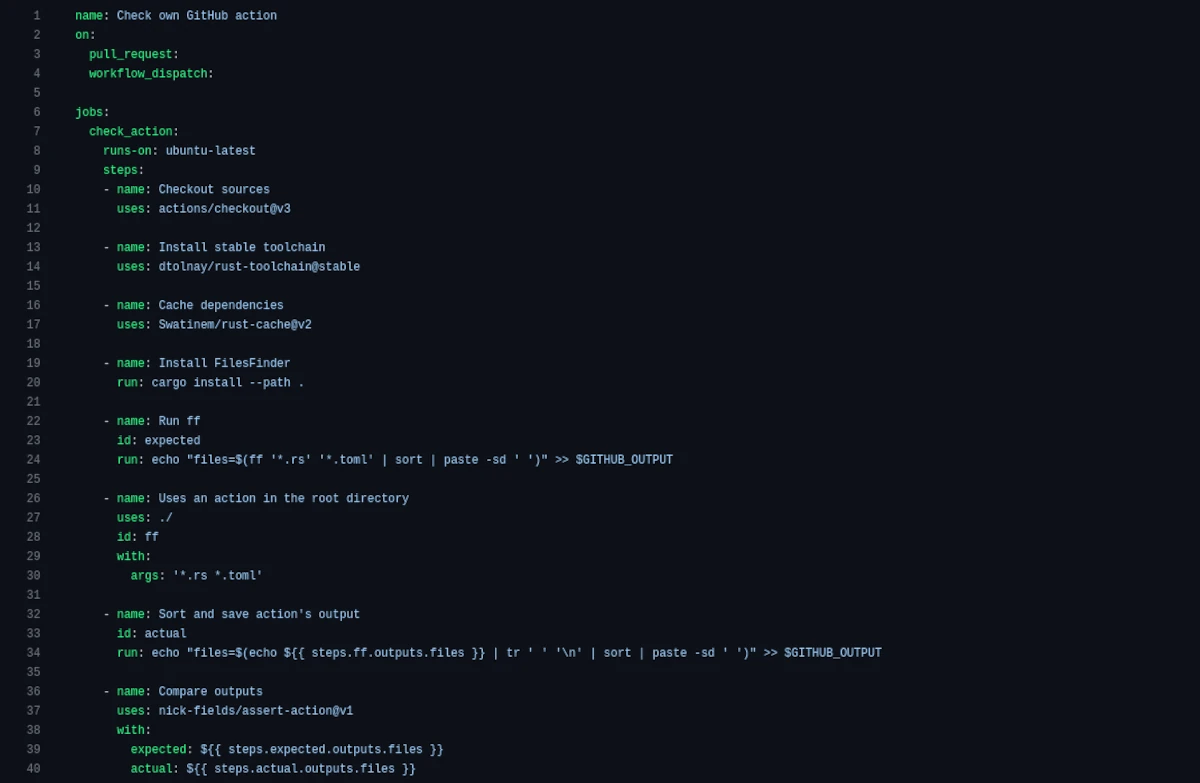
Testing your action
Continously testing that your action is working is very important: you don’t want to release a broken action on the Marketplace, don’t you?
We will therefore use Github actions… to test your own action!
1
2
3
4
5
6
7
8
9
10
11
12
13
14
15
16
17
18
19
20
21
22
23
24
25
26
27
28
29
30
31
32

name: Check own GitHub action
on:
  pull_request:

jobs:
  check_action:
    runs-on: ubuntu-latest
    steps:
    - name: Checkout sources
      uses: actions/checkout@v3

    - name: Install stable toolchain
      uses: dtolnay/rust-toolchain@stable

    - name: Install MyApp
      run: cargo install --path .

    - name: Run myapp
      id: expected
      run: echo "results=$(myapp --option1 'value1')" >> $GITHUB_OUTPUT

    - name: Uses an action in the root directory
      uses: ./  # This is a trick to use the local GitHub action
      id: actual
      with:
        args: "--option1 'value1'"

    - name: Compare outputs
      uses: nick-fields/assert-action@v1
      with:
        expected: ${{ steps.expected.outputs.files }}
        actual: ${{ steps.actual.outputs.files }}
Publishing
GitHub actions (again) make it very easy to publish both a new version on crates.io and a new Docker image on your favorite container registry. To keep things simple, I decided to use the GitHub Container Registry (ghcr.io), as it does not required creating an additional account.
If used, the follow workflow will, on every new tag you push, publish a new version of your Rust package (publish-crate job) and publish a new version of your Docker image (publish-docker job).
For the former, you need to setup the CRATES_TOKEN secret variable for pushing on crates.io. See Encrypted secrets.
1
2
3
4
5
6
7
8
9
10
11
12
13
14
15
16
17
18
19
20
21
22
23
24
25
26
27
28
29
30
31
32
33
34
35
36
37
38
39
40
41
42
43
44
45
46
47
48
49
50
51
52
53
54
55
56
57

on:
  push:
    # Pattern matched against refs/tags
    tags:
    - '*'  # Push events to every tag not containing /

name: Publish

env:
  REGISTRY: ghcr.io
  IMAGE_NAME: ${{ github.repository }}

jobs:
  publish-crate:
    name: Publish binaries on crate.io
    runs-on: ubuntu-latest
    steps:
    - name: Checkout sources
      uses: actions/checkout@v3

    - name: Install stable toolchain
      uses: dtolnay/rust-toolchain@stable

    - run: cargo publish --token ${CRATES_TOKEN} || echo "This never fails"
      env:
        CRATES_TOKEN: ${{ secrets.CRATES_TOKEN }}
  publish-docker:
    name: Publish Docker image
    runs-on: ubuntu-latest
    steps:
    - name: Checkout
      uses: actions/checkout@v3

    - name: Set up Docker Buildx
      uses: docker/setup-buildx-action@v2

    - name: Login to Docker Hub
      uses: docker/login-action@v2
      with:
        registry: ${{ env.REGISTRY }}
        username: ${{ github.actor }}
        password: ${{ secrets.GITHUB_TOKEN }}

    - name: Extract metadata (tags, labels) for Docker
      id: meta
      uses: docker/metadata-action@v4
      with:
        images: ${{ env.REGISTRY }}/${{ env.IMAGE_NAME }}

    - name: Build and push
      uses: docker/build-push-action@v4
      with:
        context: .
        target: runtime
        push: true
        tags: ${{ steps.meta.outputs.tags }}
        labels: ${{ steps.meta.outputs.labels }}
Then, you must manually create a release with target tag to publish in the Marketplace. See Publishing actions in GitHub Marketplace.
Conclusion
I hope that this small tutorial was clear enough, and that you capture the necessary details to create your own GitHub action using Rust code.
Again, I strongly encourage you checking my FilesFinder project, which is a basic example implementing what I have written here.
Thank you for reading this post! Do not hesitate to reach me for questions or else!
FilesFinder is faster for searching files (not directories) based on patterns, but does not mean to implement all the complete set of features from
find. ↩︎Some may argue that you could push pre-built binaries to GitHub releases, and then download them in the workflow file. While this also works, this, in my opinion, is more difficult to setup. ↩︎